Home
The 'Layer-by-Layer' (LbL)
Intro
-
follows the same path (no need to restart from scratch)
-
Relies on just a single algorithm:the 'Sledgehammer' (no memory effort)
-
No black magic: any step is intuitive
-
1st move: action move - does the job
-
2nd move: protection move - keeps the job safe
-
last 2 moves: cleanup - undo side effects
Orientation
- Yellow face up
- Blue face on the front
- Red face on the right
Step 0 White cross
-
Solve one white edge at a time. (that is not the daisy approach.)
-
Move the edge to Level 1, then up to Level 2.
-
Move the edge to Level 2, then up to Level 3.
Ensuring the white sticker faces up (on the yellow face)..
-
Rotate the top face to match the side colour with its centre.
-
Rotate that face 180° to insert the edge. Done!
-
F'
: brings the
WB
edge into the 'Y' region' also called 'workbench'
-
(R U' R' U)
: This
Sledgehammer
. brings the
WB
edge from
layer 2
to
layer 3
without damaging the already placed edges in the 'white cross' (if any).
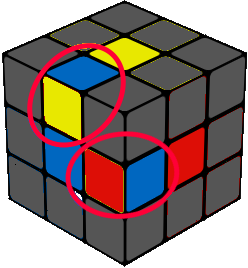
The 'Sledgehammer' to choose (there are 6 sledgehammers on the same 'Y' region: the 'workbench').
is the one starting with your intended move: R in this case
All other moves follow from this.
(The first move is the 'action move': it brings the White-Blue edge onto the yellow face, white up)
-
U
: Brings the
WB
edge onto the Blue face
-
(F2)
: (F F) Brings the
WB
edge to its final place-
Actually, the Sledgehammer is a bit too stiff for the cross, but it's a great way to start using it.
Step 1: Layer 1
-
(R U' R' U)
: This
Sledgehammer
. brings the
RWG
corner from
layer 1
to
layer 3
preserving the job already done on 'layer 1'.
To 'Sledgehammer' to choose (there are 6 on the same 'Y' region: the 'workbench'),
is the one starting with the move you want to do: R in this case.
All the other moves are forced by the previous.
(R is the 'action move': the move that brings the White-Blue edge onto the yellow face white up)
-
(U2)
: (U U) Brings the
RWG
edge to the position
rub
-
(R B' R' B)
: This
Sledgehammer
. brings the
RWG
edge from
layer 3
position
rub
to
layer 1
position
rdb
Again choose the 'Sledgehammer' that starts with the move you want to do: R
-
(R B' R' B)4
: This
Sledgehammer
. doesn't change position to the corner
RWG
but changes the orientation One orientation change every two repetition of the 'Sledgehammer'.
Step 2: Layer 2
-
(U2)
: (U U) Brings the
RG
edge to the position
mub
ready to go onto position
reb. (Its final destination)
-
D
: Brings the cubie in the
rdf
corner into the
rdb
position to protect the
RWG
corner from the next 'Sledgehammer'.
-
(B' R B R')
: This
Sledgehammer
places the
RG
edge from layer 3 to layer 2,
but also targets the placeholder corner at
rdb
which is displaced (its final position is irrelevant).
-
D'
:
Returns the
RWG
corner to its correct position.
Step 3.1: Layer 3 (1st half)
-
U
Brings the
YG
edge to the position
rus
-
(R' F R F')
: This
Sledgehammer
. brings the
YG
edge from
layer 3
to
layer 2
-
(F' U F U')
: This
Sledgehammer
. brings the
YG
edge from
layer 2
position
ref
to
layer 3
position
muf
Taking the long path for correct orientation.
-
(U' R U R')
: This
Sledgehammer
. brings the
YG
edge from position
muf
to position
rus
-
U'
Brings the
YG
edge back to its place: the position
mub
Step 3.2 Layer 3 (2nd half)

-
The edge
YG
goes from
mub
to
rus
-
The edge OY
goes from
lus
to
mub
-
U
Brings the
YG
edge to the position
rus
(into the 'workbench')
-
(U F' U' F)
: This
Sledgehammer
. moves the
YG
edge from
mub
to
rus
-
U'
Brings the
OY
edge into the 'workbench'
-
(U F' U' F)
: This
Sledgehammer
. brings the
OY
edge to its new position
Step 3.3:Orientation